Study Skills Core Modules
| Site: | Godalming Online |
| Course: | Study Skills |
| Book: | Study Skills Core Modules |
| Printed by: | Guest user |
| Date: | Monday, 23 December 2024, 10:14 AM |
Table of contents
- Introduction
- Study Skills Core Modules - How to navigate
- Organisation
- Time Management
- Prioritising
- Note-Taking
- Revision & Exam Practice
- Revision & Exam Practice Tip #1 - Work out how you like to revise
- Revision & Exam Practice Tip #2 - Picking your revision methods
- Revision & Exam Practice Tip #3 - Create and prioritise a revision timetable
- Revision & Exam Practice Tip #4 - Get your revision materials sorted
- Revision & Exam Practice Tip #5 - How long should you revise for?
- Revision & Exam Practice Tip #6 - Answering exam questions
- Revision & Exam Practice - Summary & Review Quiz
- Exam Preparation
Introduction
What is this all about?
In order to comfortably survive your time here at college, you will need to develop your study skills.
Study skills help to solve many of the problems students face when studying A level, BTEC or GCSE courses, and they’re also the skills you’ll need to be successful in your future studies and careers after college.
The Core Study Skills Modules will look at the main study skills you'll need for college. You can complete each module either within the relevant suggested term (see table below), or all the sections any time before the end of the academic year. And you can always come back and re-read and download the relevant information and resources again whenever you need to.
BREAK
What do you have to do?
The minimum amount of work involved is to read through each module and complete and upload the Review Quizzes at the end. You can do this during your study periods, or you may get to do this during your Personal Tutor sessions.
You can also improve your skills further by completing all the relevant 'quick activities' within each Core Module. The module instructions will tell you which activities are essential (i.e. really useful to do!) and which are optional.
Whenever you complete a Quick Activity, you can upload your work online. If you have completed the work on paper (handwritten), scanned versions will also be acceptable - all the large printers in college have a scan-to-email facility, which is free to use.
BREAK
BREAK
Before you go any further, it's a good idea to think about the skills you're currently good at and those you might need to work on. So here is your first essential activity:
BREAK
 Quick Activity
Complete this Study Skills Self-Assessment. You should discuss your answers with your Personal Tutor during your next one-to-one session, and if you have any concerns, you can also discuss them with the Learning Support department.
BREAK
BREAK
BREAK
Table of Contents - Core Study Skills Modules:
| Module | Suggested Completion Date |
| Autumn Half Term | |
| Note-Taking | Christmas Holidays |
| Revision and Exam Practice | Easter Holidays |
| Exam Preparation | Before Study Leave Begins! |
BREAK
Study Skills Core Modules - How to navigate
 How to navigate the Core Modules course
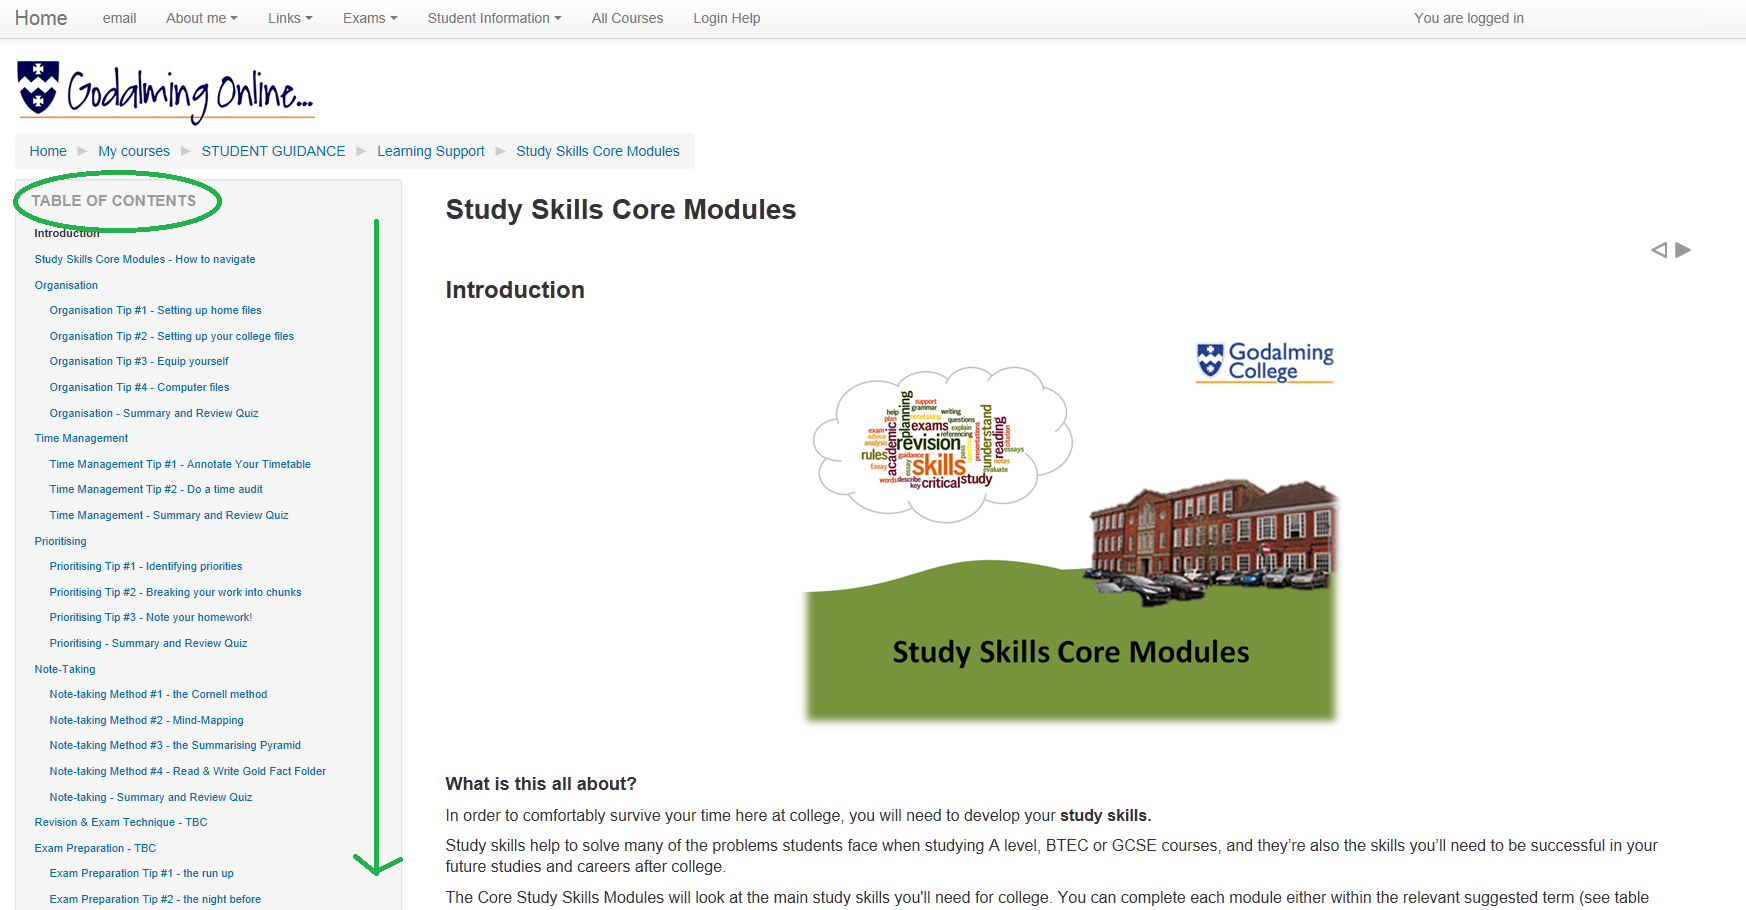
The Study Skills Core Modules are broken down into separate sections and sub-sections. You can either move backwards and forwards through the sections using the arrow direction keys on the top and bottom right of each page:

or you can navigate through the entire table of contents on the left-hand side of your screen to jump to the specific section you are interested in:
So choose your starting point now to begin working through the Study Skills modules...
Organisation
At the moment, you may feel pretty organised.

But in a few weeks’ time, your life will be full of worksheets, books, class notes, stuff you should have done, stuff you think you’ve lost but you’re not sure, it might still be here... somewhere… ?!!
And before you know it:

OK, not everyone gets this bad, but everyone can do with a reminder about keeping bags, desks, and life in general, tidy!
Work through the chapters of the Organisation module to learn our top tips for organising yourself.
Try out the accompanying Quick Activities to actively help you improve your organisational skills.
Organisation Tip #1 - Setting up home files
 No one can carry all their work around with them for the whole year (unless they have a huge back and are aspiring to be the next World’s Strongest Person!).
So at home you need your main set of subject files, which ideally could be big lever arch files (your 'home files’).
Label them for each of your subjects, and add dividers for each of the course units and topics you’ll be studying…
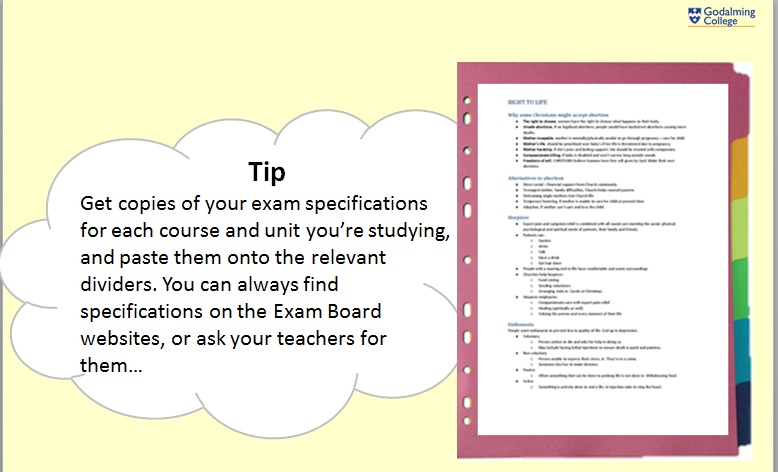
Every time you’re done with a piece of work, and you no longer need to bring it into class, transfer it to your ‘home files’ in the correctly marked section.
BREAK
 Quick Activity:
Complete the table in the worksheet below for each of your college subjects so that you know which unit specifications to look for – this will also be very helpful for revision later on.
Save this worksheet on your college computer drive (it will be very useful to know which exam board and units you are studying when filling in your university of HE qualifications later).
This is an essential activity. You can upload it using the upload link below so that you can always access it in future on this page by clicking again on the upload link and viewing your word or pdf document.
| Organisation - Specifications Worksheet | Upload the worksheet here |
Don’t forget to also check the Godalming Online subject sites to see if your teachers have made the specifications available on there. You may also want to talk to your teachers about which topics within the units you will definitely be studying (and therefore needing to revise later!).
Organisation Tip #2 - Setting up your college files
For everyday use, you’ll need a suitable set of light files, such as basic ring binders.

Make sure you organise these clearly too, especially if you decide to use one binder for multiple subjects.
You could split the file dividers between different teachers (if you have more than one for a course), or different days, so you know where you should have filed that homework for Tuesday next week…!
Every time you add some work to your files, you may want to use a code on the top of each sheet of paper to indicate the topic. You could use the specification number (e.g. 3.1.a.) or a code of your making, such as a coloured square or a shorthand name for the topic. This will help you later when you come to search through your notes for revision.
Break
![]()
Organisation Tip #3 - Equip yourself
 Make sure you’re fully equipped for all your study needs by getting the right kind of equipment and working out exactly what you’ll need for every college day, and what you can leave behind at home for later.
If there’s anything you’re missing, ask at the Student Reception to see if they have any in stock they can sell to you (prices are very reasonable!).
BREAK
 Quick Activity:
On the worksheet below, make a note of (a) all the things you might need to have with you every day in your bag, and (b) all the things you will need to have available at home to help you study.
This is an essential activity. You can upload it using the upload link below so that you can always access it in future on this page by clicking again on the upload link and viewing your word or pdf document.
| Organisation - Equipment Worksheet | Upload the worksheet here |
Remember, the college has a lot of student study space with access to Wi-Fi, computers, photocopiers, printers, and scanners if you do not have access to these at home.
Organisation Tip #4 - Computer files
Whilst we’re talking about computers, you should treat your electronic filing system in exactly the same way as you do with your lever arch files:
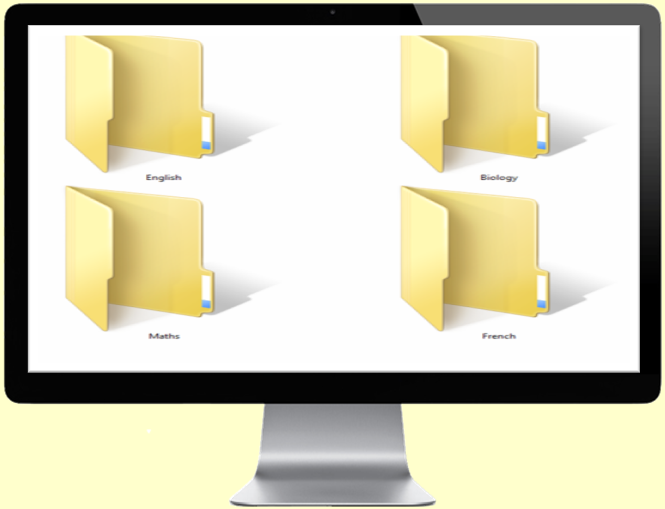
Set up subject folders under your college profile and on your home computer as soon as possible, and make sure you save work into the correct folders.
Remember to save and back up your work regularly, especially if it’s an importantly large piece of coursework or homework…
Organisation - Summary and Review Quiz
![]() BREAK
BREAK
To be organised for college you need to:
- get yourself subject folders at home and for bringing in to college,
BREAK - set up folder dividers and print out specifications or topic lists to paste on to them,
BREAK - get all the right equipment in your college bag and on your desk or working space at home, and
BREAK - set up electronic folders on your computers and regularly back them up.
BREAK
 Organisation Module Review Quiz
Now that you have worked through the Organisation Module, you need to complete the Review Quiz.
Your Personal Tutor may want to discuss the answers you give to this quiz in a future one-to-one discussion, and if you have any further questions or concerns about organising yourself for college, you can always visit the Study Centre, room 235 at the top of the ILC.
| Review Quiz - Organisation |
Getting yourself organised right now means:
 |
You’re less likely to feel stressed and anxious about revision or coursework deadlines later… |
 |
You’re more likely to find your homework, class notes and worksheets whenever you need them! |
You’ll be ready and willing to use this skill in every aspect of your life…
BREAK
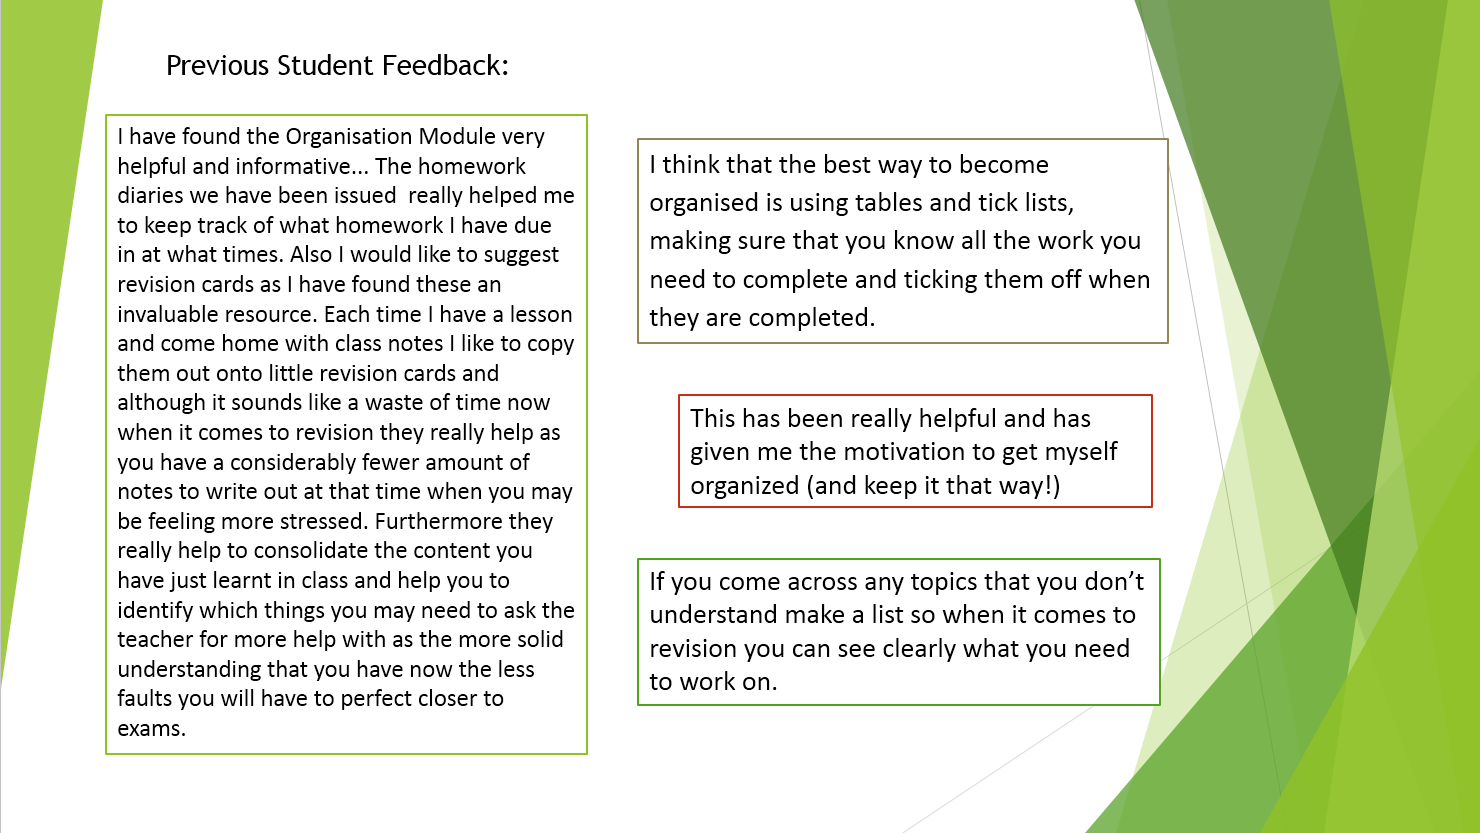
Organisation takes a bit of initial work, and continual practice, but eventually you’ll forget it was ever a problem you needed to complete a course on…
XXX
Time Management
 Once you’ve organised yourself, it’s time to actually get down to doing your work. But do you actually have the time to get everything done by all the deadlines…?
BREAK
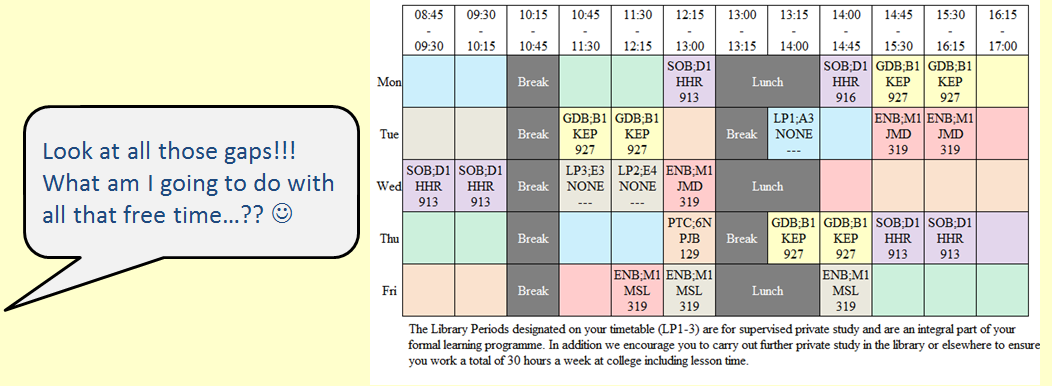
One of the most exciting things about college is when you receive your first timetable:
BREAK
Sadly all those "free gaps" of time with no lessons are not really as free as you might think. They are, in fact, the most useful part of your college week if you know how to use them well. So before you start filling them all up, you need to learn to manage your time...
BREAK

Time Management Tip #1 - Annotate Your Timetable
Start by looking at your college timetable.
After a few weeks, you’ll start to notice homework patterns:
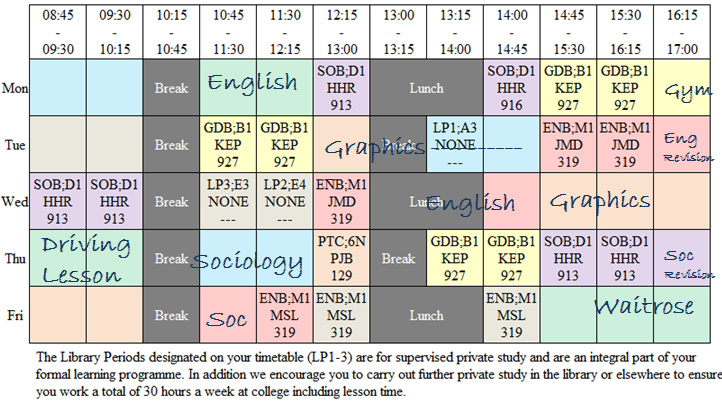
English is always Wednesday, due in the following Monday; Sociology is always Friday and you have a week to do it, etc…
BREAK
 Quick Activity
Take some time to annotate your own timetable with the best study periods (or evenings) for completing your work using the quick activity worksheet below.
Include any extra-curricular activities, and be realistic about what you’ll really do first thing in the morning and last thing at night.
Work out how long you need to spend on your subjects a week, and allocate time accordingly (coursework-heavy and practical subjects might need more of your time) using the table beneath the timetable.
This is an essential activity. You can upload it using the upload link below so that you can always access it in future on this page by clicking again on the upload link and viewing your word or pdf document.
| Managing Your Time - Quick Activity | Upload your completed worksheet here |
When it comes to revising, you may need to add a few extra evenings of study in as well, so keep a copy of your timetable saved somewhere to allow you to alter it later on in the year.
Be flexible, but try to get into a good routine that works for you and stick to it.
Keep a copy of your annotated timetable in your files, pasted into your planner, or on your phone, so that you can refer to it throughout the day to make sure you're properly using your time.
Time Management Tip #2 - Do a time audit
 If you’re still feeling overwhelmed by how much you have to do and how little time you have to do it, you could do a time audit to take a look at how you’re really using your day, and whether you could use your time more productively:
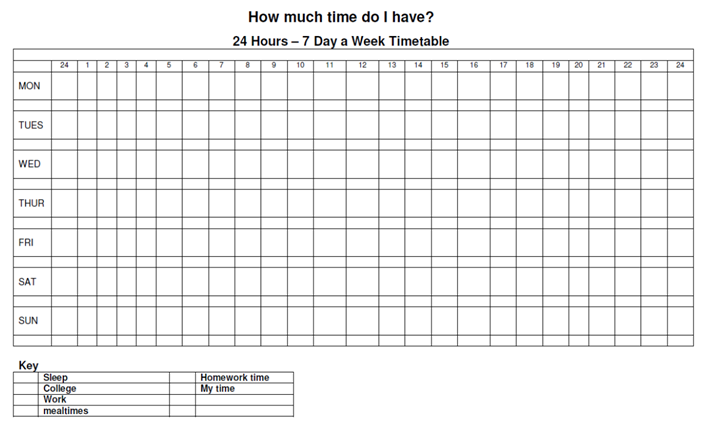
You can find this worksheet below as an optional Quick Activity. It’s an interesting experiment to try! Are you spending too much time watching TV, or social networking…? Maybe you need to reduce your job hours or get up a bit earlier…?
 Quick Activity
This activity is optional, so you do not have to upload it. However, if you are struggling to manage your time, you may want to try this experiment and discuss the results with your Personal Tutor or one of the Study Support team in the Study Centre.
| Managing Your Time - Optional Quick Activity | Upload your completed worksheet here |
Time Management - Summary and Review Quiz
BREAK
To effectively manage you time at college you need to:![]()
- work out when you have things to do (e.g. homework), how long (approximately) you need to spend on this, and when your deadlines are,
BREAK - annotate your college timetable now to include your homework sessions, additional subject time (e.g. for revision and reading around your subject) and any extra activities you do (e.g. job, driving lessons, clubs, etc.),
BREAK - be flexible, but stick to the 'working week' plan so that you get into a good routine, and
BREAK - do a time audit to work out where all your time is going. Don't forget to ask for help if you're really struggling to cope...
BREAK
 Time Management Module Review Quiz
Now that you have worked through the Time Management Module, you need to complete the Review Quiz.
Your Personal Tutor may want to discuss the answers you give to this quiz in a future one-to-one discussion, and if you have any further questions or concerns about managing your time at college, you can always visit the Study Centre, room 235 at the top of the ILC.
| Review Quiz - Time Management |
BREAK
Managing your time correctly right now means:
 |
You’re more likely to complete your work to the best possible standard, rather than leaving everything to the last minute and producing a rushed, possibly inaccurate piece… |
 |
You’re less likely to miss deadlines and get into trouble with teachers! |
 |
You won’t have to stay up until 2am finishing off work for the next day! |
 |
You’ll learn how to balance all the different elements of your life – college, studying, social life, jobs, family, etc. And this will definitely help you for the rest of your life! |
It’s a common modern complaint: “I don’t have enough time!” But if you organise yourself and manage your time correctly, you’ll be amazed how much time you do have...
Prioritising
Alongside organisation and time management, prioritising is one of the three major study skills you'll need to learn as soon as possible to help you manage college work and life in general.
You may have all your work organised and you may have set up the perfect time slots each week to complete your homework, coursework and other demands on your time. But what happens when even those study sessions don't feel like enough time to get everything finished...?!
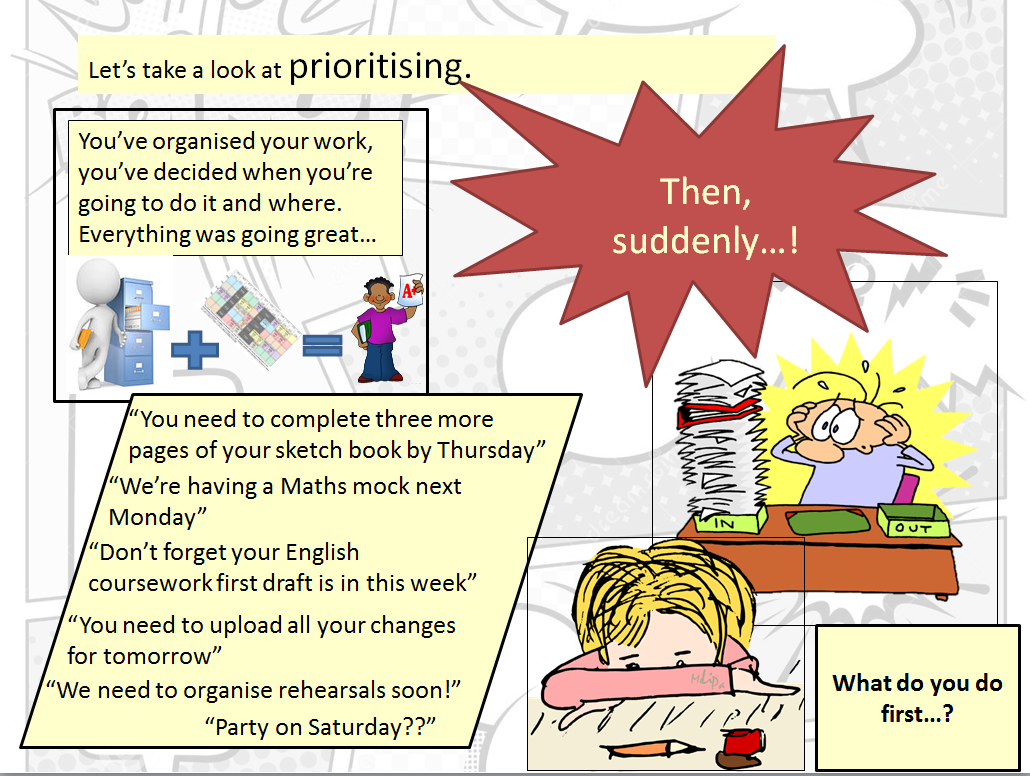
Work through the tips in this module to help you learn how to prioritise when work starts to build up.
Prioritising Tip #1 - Identifying priorities

One way to avoid getting overwhelmed with work is to spend a bit of time each week identifying what you have to do and by when:

XXXXXXXXXXXXXXXXXXXXXXXXXXXXXXXXXXXXXXXXXXXXXXXXXXXXXXXX
You can then decide which jobs are priorities and work through the list in your allotted study times.
Prioritising Tip #2 - Breaking your work into chunks
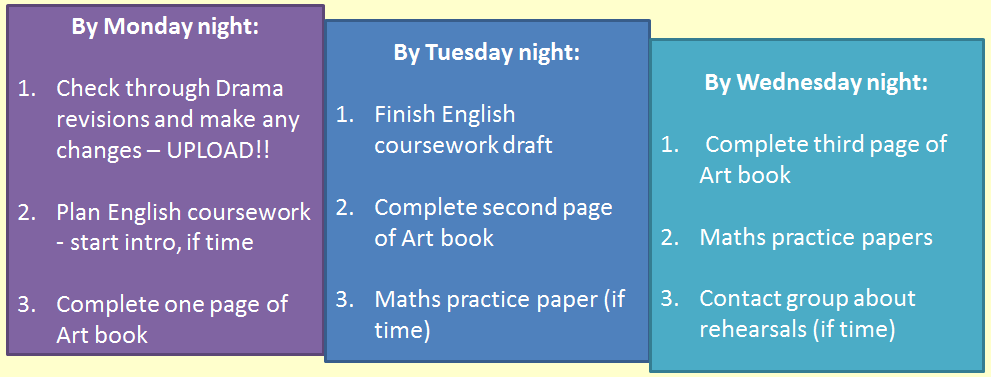
If the amount of work on your priority list still feels overwhelming, consider breaking it all down into smaller, more realistic chunks:
BREAK
BREAK
If you learn to break things down into manageable chunks that work for you, you’ll realise how easy it is to get all your work done by deadlines. Stay calm and remember to ask for help if you need it!
BREAK
To practice breaking your work down, complete the Quick Activity worksheet below for the next college week. You may not have very much work to complete yet, but it's a good idea to get into this habit now, or to at least try it out so that you know how to do it later when you really need it! If you currently do not seem to have very much to do, don't forget that you should also be using your time to organise your notes and read around you subjects, so you could add those tasks in for this week.
BREAK
 Quick Activity:
Complete the worksheet below, listing the work you need to do for the next week of college in the first table, and then breaking it down into daily manageable chunks in the second table.
This is an essential activity. You can upload it using the upload link below so that you can always access it in future on this page by clicking again on the upload link and viewing your word or pdf document.
| Prioritising - Quick Activity | Upload your completed worksheet here |
If you would prefer to upload a later version of this worksheet with more examples on it, you can re-upload your work at a later time.
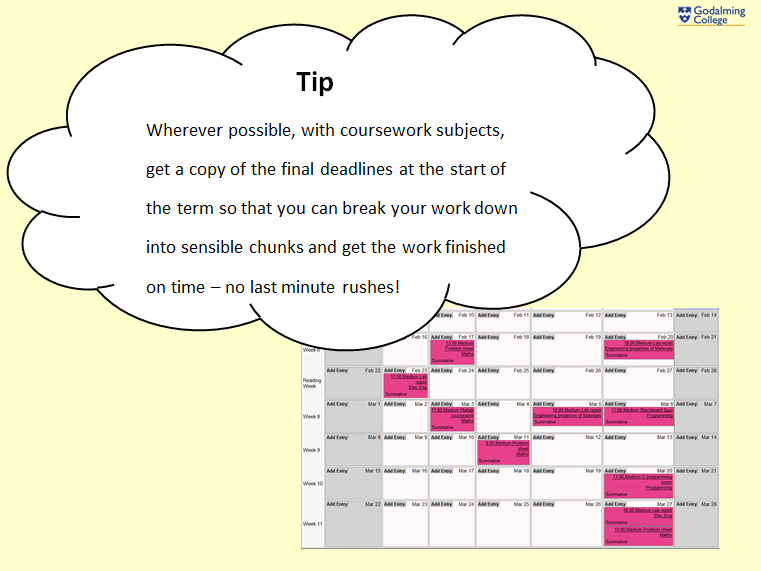
Prioritising Tip #3 - Note your homework!
BREAK
Get into a good homework-noting habit now. You will be provided with a student planner (homework diary) or you may already have your own. You can use this to work on your priority lists:
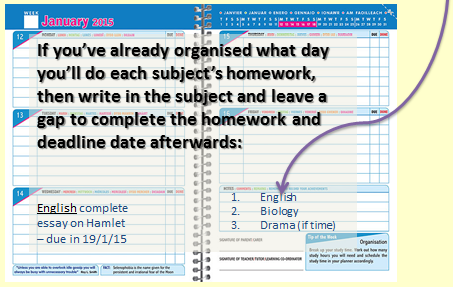
BREAK
If you don’t work well with paper planners (particularly if you tend to lose them!) try using a planner app on your phone or tablet, or set something up on the computer that you can access every day. Outlook has useful calendar reminders or tasks systems you could use, and most mobile phones have similar systems as well (e.g. calendar and reminders on iPhone).
BREAK
Pick your system now and stick with it, to help you develop a positive working habit.
Prioritising - Summary and Review Quiz
BREAK
 To get used to prioritising your college work right now you need to:
- get into the habit every day and each week of prioritising what needs to be done and by when,
BREAK - break tasks down into manageable chunks with realistic timescales,
BREAK - make sure you keep good homework notes, either in a diary/planner, or electronically, and
BREAK - when things get tough, don’t panic – ask for help!
BREAK
 Prioritising Module Review Quiz
Now that you have worked through the Prioritising Module, you need to complete the Review Quiz.
Your Personal Tutor may want to discuss the answers you give to this quiz in a future one-to-one discussion, and if you have any further questions or concerns about prioritising your college work, you can always visit the Study Centre, room 235 at the top of the ILC.
| Review Quiz - Prioritising |
BREAK
Learning to prioritise right now will mean:
 |
You’ll have better control of your own time – meaning more time for independent learning, extra-curricular activities, jobs, driving lessons… and YOU! |
 |
You’ll have that pleasure of ticking things off the list on a regular basis – always a good feeling! |
Learning to prioritise will free you from the stress of feeling overwhelmed with too much work later on. You’ll get used to knowing what needs to be done and by when, meaning you’ll be more organised and you’ll have better time management!
Note-Taking

There won’t be many classes at college that don’t involve an element of note-taking. You might have to take notes from your teachers’ presentations or lectures; you might be asked to make notes from a textbook; you might have to make notes about a film, or a TV programme, or a book, or something else that you’re studying. Sometimes you might be provided with a useful worksheet on which to fill in your notes, but often you'll have to work out your own best method for note-taking, in and out of classes.
There are lots of different types of note-taking systems, all of which have their different benefits and uses for your study.
In this module we will be introducing a couple of different types of note-taking techniques and tips for use in and out of class which you can try out.
Look through the different methods of note-taking and complete the Review Quiz at the end of this module. You can also upload evidence of having tried out the different note-taking methods if you wish.
It's a good idea to have a look through all the different methods to see their benefits.
BREAK
BREAK
 Note-taking System #1 - The Cornell Method
A simple method; combines in-class note-taking, reviewing and revision all in one!
Note-taking System #2 - Mind-Mapping
A creative and visual way of organising topic notes for revision or planning an essay.
Note-taking System #3 – Summarising Pyramid
A visual way of reducing a large amount of text or knowledge into a smaller summary of important points. This is also a good technique for pair or group work.
Note-taking system #4 – Using the Fact Folder on Read & Write Gold
A useful way of collecting together information from the internet for later use in coursework projects or essays. It even creates a bibliography of facts for you!
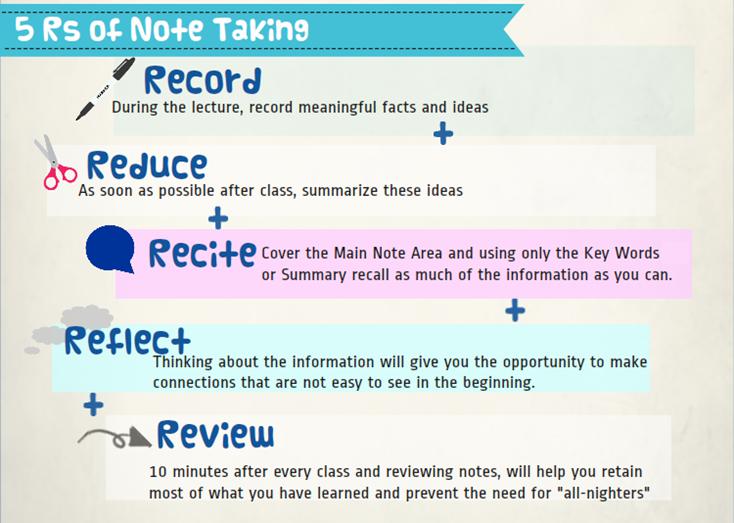
Note-taking Method #1 - the Cornell method
One type of note-taking you may not have heard of is the Cornell method.
This is a great way of taking, condensing and organising your class or lecture notes without the need for laborious recopying later. This means it can be used to review the class/lecture at the end of the day (always a good habit to get into!) AND is a ready-made piece of revision.
Method:
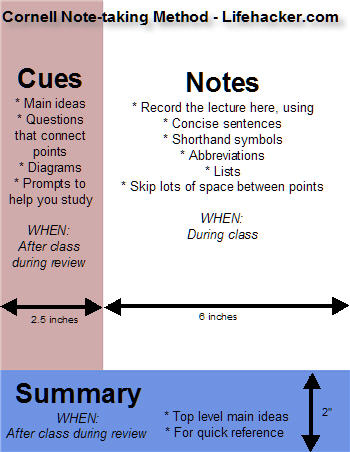
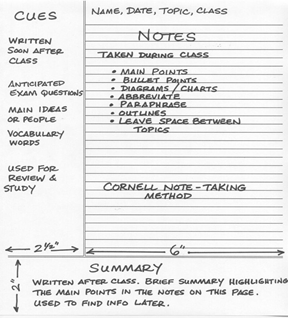
Take a ruler (or fold the paper) and create a line approximately 2.5 inches in from the left-hand margin (if you’re left-handed, you could experiment with folding along the right-hand side to see if that layout is easier for you). This should leave a larger space to the right of the page.
If you’re using a computer to take notes, you may want to create a table with two columns and adjust the width-sizes on the screen.
BREAK
During class (record):
- Make notes from the board, lecture or discussions in the right-hand space.
BREAK - Whenever the topic changes or moves on to a new point, try to leave a few blank lines.
BREAK - Don’t forget to add a relevant heading (topic title, date, etc) at the top of the page.
BREAK - Leave a space (approximately 2 inches) at the end of your notes - either on each page, or on the final page of the class/lecture notes - for later.
BREAK
After class (review & reduce):
- Try and fill in any additional points, sentences or shorthand abbreviations you remember in those blank lines so that your notes are as clear and complete as they can be.
BREAK - Then, for every significant bit of information on the right-hand side, write down a corresponding 'cue’ word or phrase in the left-hand margin next to it.
BREAK - In the space at the end of your notes, summarise all the information you have learnt, linking it to other relevant notes where necessary. This can be in full or abbreviated sentences, or as a mind-map or list - whichever suits your learning style.
BREAK
For revision (reflect & recite):
- Take a piece of card and cover over the right-hand side of the page, revealing only the cues on the left-hand side.
BREAK - Say the cue out loud, then try and say, to yourself or a revision buddy, as much as you can about the material covered by the card. When you have said all you can remember, remove the card and see how much you got right and what, it anything, you missed. Saying it out loud helps to reinforce your learning - if you can say it, you know it.
BREAK
Examples:

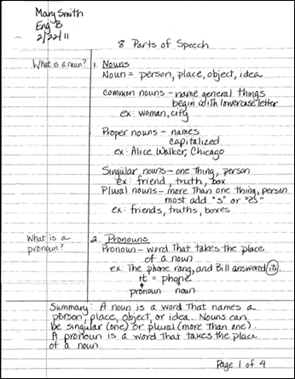
BREAK
 Quick Activity
To complete this section of the note-taking module, you can upload your own example of using the Cornell Method of note-taking. You can either upload a scanned copy of handwritten notes you have taken in class, or you can use and upload a completed example on the Word template below. You might chose to type up some class notes for which you did not use the Cornell Method onto the template so that you can try out the method and create your first revision sheet…
| Note-Taking - Cornell Method template | Upload your example here |
Note-taking Method #2 - Mind-Mapping
You've probably already heard of mind-maps. You may have even tried creating one in the past. Some students love them, but some just don't see the point. If you fall into the latter category, that's probably because you haven't been shown how to use them properly. Skip to the end (Method #2 below) to see what you've been missing...*
BREAK
 Mind-maps are great for consolidating notes into a single, visual and creative page. They're perfect for revision and essay planning.
BREAK
If you don't know what a mind-map is and have never seen one, here's a quick guide:
A mind map consists of a central word, idea or subject, with main ideas linked to the central image as sub-topics (see below for visual examples). Further, less important but still useful ideas connect to the sub-topics to add more detail, if needed.
The completed diagram forms a 'map’ of the topic, which will help you understand and remember the information.
Colours and pictures are used to aid memory and highlight important ideas, facts, questions, etc.
BREAK
Method #1 (record & reduce):
- Take a large blank sheet of paper or start a blank page in a mind-mapping software program or PowerPoint (a good alternative because of its shapes/lines menu). Use in landscape orientation – to give yourself plenty of room to develop ideas.
BREAK - Use coloured pens, pencils or fonts (colours help you to remember).
BREAK - Write down the main idea or subject in the centre or draw a picture which represents it.
BREAK - Next draw thick branches radiating outwards from the central idea or image. These branches represent your sub-topics.
BREAK - Write the name of each sub-topic on the branch – these are your keywords.
BREAK - Add thinner branches to the end of the thick branches – to represent your next level of thought.
BREAK - Use pictures – the brain likes images and pictures rather than text!
BREAK - Revisit later. Your brain will continue to work on it while you do other things and will provide you with fresh ideas.
BREAK - Have fun! Remember it is your mind map, so you can create it however you choose. Your brain is most effective when you are enjoying yourself.
The key to mind-mapping is to keep notes brief. But you can be as colourful or creative as you want, using highlighters, felt tips, drawings, etc.
Mind-maps don’t have to be 'spider diagrams’; they can be any shape or layout that suits your topics…
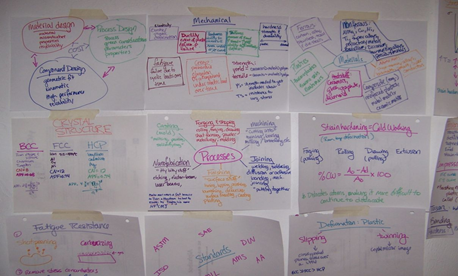
BREAK
How to use a mind-map
*Lots of students stop once they have created their mind-map. They put it in a file and forget about it, or skim over it before exams.
Better students put their mind-maps up on the wall and occasionally look at them.
The best students re-use them!
BREAK
Method #2:
- Once you've completed your mind-map, put it up somewhere you can see it - the bedroom wall, or another space you regularly look at.
BREAK - Then, at suitable intervals (e.g. once a week), without looking at the original, try and re-draw your mind-map from memory - you don't have to use all the colours and pictures this time, just work on the labelled branches.
BREAK - When you've drawn as much as you can remember, compare it with the original. See how many branches you got right.
BREAK - Add new images or colours to those branches you got wrong or missed out to help you remember them better for next time.
BREAK - You can also ask someone to test your knowledge by questioning you on the individual branches and asking you for more information about them.
BREAK
By the time you sit an exam, you should be able to copy the mind-map out in less than 5 minutes, providing you with all the information you need to answer a question on that topic... Genius.
BREAK
Examples:
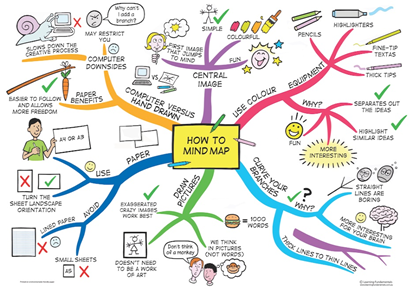

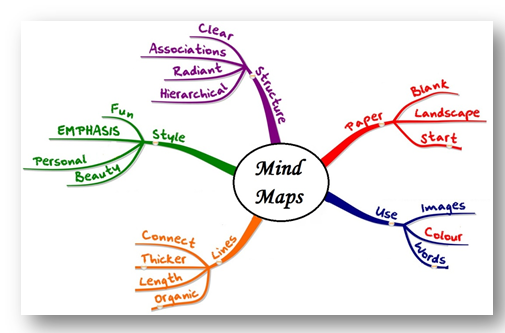

BREAK
 Quick Activity
You can upload your own example of using a mind-map. You might chose to rework some class notes or create your first revision sheet. You can either upload a scanned copy of a handwritten version, or create a mind-map using PowerPoint, Word, Publisher or any other computer program that is flexible enough.
Note-taking Mind-Mapping Activity: Upload your completed Mind-Mapping example here
BREAK
A couple of programs you may find on the college computer system (by searching in the start button on the bottom left of your screen) include Miscrosoft Visio (see this YouTube demo)
Note-taking Method #3 - the Summarising Pyramid
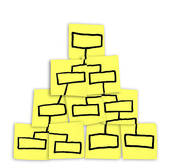 This method of note-taking will help you to learn how to reduce large chunks of text – most likely from a book, webpage, journal article or a collection of multiple sources – into simple summaries. It’s easy to do by yourself, but it also works really well as a collaborative technique (pair or group work, for example).
BREAK
There are two types of Summarising Pyramid - the 'bottom-up' method and the 'top-down' method.
'Bottom-Up' Symmarising Pyramids
This method of note-taking will help you to learn how to reduce large chunks of text – most likely from a book, webpage, journal article or a collection of multiple sources – into simple summaries. It’s easy to do by yourself, but it also works really well as a collaborative technique (pair or group work, for example).
BREAK
Method #1:
You can use this template as a guideline. You will need:
- several pieces of paper – scrap paper or card is ideal, as long as it has one clean side to work on, or you might choose to use different coloured paper/card for each stage of the pyramid.
- lots of space to work in, so you may choose to spread out on the floor or a clear table.
- highlighter pens or felt tips
- your article, text or webpage
BREAK
Alternatively, you could complete this method in a Word or PowerPoint document. A template example can be found here, but you can also make your own. For the walk-through examples below, I used PowerPoint and added text into Text Boxes and Shapes.
BREAK
1. Read through the text and highlight the main ideas:

2. Starting at the base of the pyramid, using short sentences or bullet points (and preferably your own words), write down summaries of the points, facts and useful quotes you have highlighted.

If you are starting by making the notes all on one page, try to leave a good gap between each new point and only use one side of the page (when you have made as many notes as you think you need, cut up the separate points). The best method is to use separate cards or boxes on a page for each new fact.
BREAK
3. Sort the facts into related piles (this might be based on the order they appear in the article, or linked topic points, for example).
BREAK
4. Now come up with 2 or 3 subheadings that sum up each of your piles of facts. These subheadings should be written at the top of the next level of cards. Beneath these subheadings, try and write a short summary of the facts in the pile below.

5. Once the subheading cards (or main ideas of the text) are in place, you should be able to provide a short summary of what the whole article is about beneath a main topic heading in the card at the very top of your pyramid.

This bottom-up Summarising Pyramid approach is good for practicing how to reduce an unknown text, extracting only the information you really need from it, so it is perfect for source analysis.
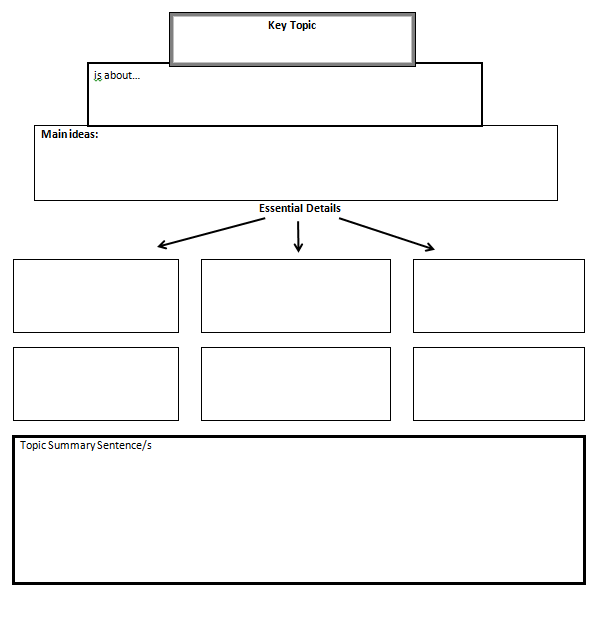 Top-Down Symmarising Pyramid
The other approach to the Summarising Pyramid is to work from the top-down. This approach is best if you want to create a summary sheet on a topic you may already be familiar with and produces a good revision sheet at the end.
BREAK
Method #2:
All you will need for this is this template, which can either be printed out and handwritten, or typed up.
BREAK
1. Open the template.
2. Write in the main key topic at the top of the pyramid.
3. Explain in one or two sentences below what the topic is about.
4. using bullet points or short sentences, note down the main ideas behind the key topic.
5. Fill in the essential details below. These might be, for example, names of practitioners and their research, essential timeline dates, or for and against arguments.
6. Complete a short, overall summary of the topic at the bottom of the page.
BREAK
Both Summarising Pyramid methods are great ways to learn how to condense your work into a single, re-useable sheet of notes, perfect for revision or planning.
BREAK
 Quick Activity
You can upload your own example of using either a bottom-up or top-down summarising pyramid. You can either upload a scanned copy of a handwritten version, or create a version using the templates.
| Upload your completed example here |
Note-taking Method #4 - Read & Write Gold Fact Folder
This method is ideal if you need to do lots of internet based research for coursework or projects.

Read & Write 10 Gold is a program available on the college system. It incorporates a research tool to help you revise or prepare information to write reports or assignments. This Fact Folder allows you to capture text and pictures from any application, classify it and record its source. This information can be converted to a Word document to help with studying and revision.
You will need to be on a college computer and have access to the internet.
BREAK
Method:
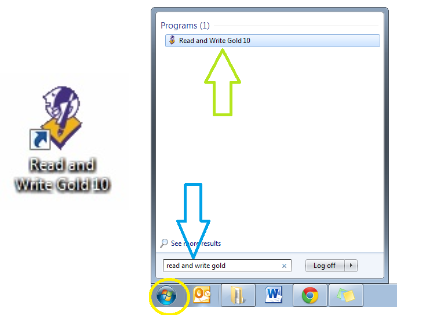
1. Open Read & Write Gold by clicking on the desktop icon, or searching under the start tab search box.
2. Make sure you can see the 'Research Features’ toolbar options. If you are not sure, click on the black down-arrow (menu button) to the right of the 'textHELP’ button on the far right of the toolbar, choose 'Current Toolbar’ and in the dropdown menu, select 'Research Features’.

3. Begin your internet research on the topic of your choice. If you are just practicing, try researching volcanos by opening any search engine (e.g. Google) and typing 'volcanos’ into the search box.
BREAK
4. Once you see something of interest on a site, select the relevant text on the page and click on the Fact Folder button. ![]() The Fact Details panel appears.
The Fact Details panel appears.

5. Notice how the Item Title, Date, Author and Source fields have been completed automatically. You can alter this by clicking in each box and editing as required. Changing the title will not delete the text you copied, so call it whatever you want.
BREAK
6. In the Author field type the name of the website or the site/article author if you know it.
BREAK
5. Next to Category, click on the 'three little dots' button (see image below) and then click 'Add' and type a category name, e.g. Volcanos, into the box and then OK to add it as a Category. Select it and then click OK. You can leave the description box empty, or type in a short description of the pasted text, then click OK. A little popup will appear on the right of the screen to confirm that a fact has been added.

6. To add an image from the internet to your collection of facts, click on the black down-arrow to the right of the Fact Folder icon and select Add web Image. The Texthelp Web Hover will appear in the bottom right corner. Move your mouse over a picture on the web page and it will appear in this panel. Click on the picture to capture it. The Fact Details panel will appear as before. Complete this with details relevant to this picture, either selecting the same category as the one you previously created, or starting a new category.
BREAK
Complete the above steps as many times as you need to whilst you collect together your research and notes.
BREAK
To see all your facts on one page:
7. Click on the black down-arrow beside the Fact Folder icon and select Review Facts.
BREAK
8. The Fact Folder opens with the information you have added. If you want to see the content of any fact, select it and a thumbnail will appear on the preview panel, or click on the 'Display Content' button. You can also edit your facts and delete them in this Fact Folder too. Hovering your mouse over an icon will give you a description of what each button does.
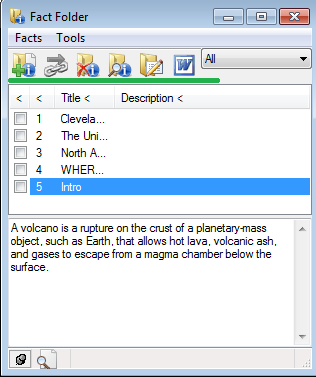 Note: before you move on to the next step, you must make sure you have saved any Word document you currently have open, as sometimes the Fact Folder crashes Word if there are too many windows open on a computer, and you will lose any unsaved work!
9. Select all the items you want to review and click on the Word icon ('Export all facts to Microsoft Word').
BREAK
10. Select the bibliography format you wish to use, such as Harvard, and then click OK.
BREAK
A Microsoft Word document will now be created with all the information you have just captured and the Bibliography will be available below it in the format you have chosen. You now have all your web research, notes and images in one place, ready for you to use in your coursework or essays.
 Quick Activity
You can upload your own example of creating a Fact Folder by uploading the Word sheet that you create with facts of your choice using the link below. You could do this for a subject project, or you could just pick a random topic, such as 'volcanoes' to research.
Note-taking Fact Folder Activity: Upload your completed Word sheet example here
Note-taking - Summary and Review Quiz
 BREAK
BREAK
Note-taking is a very important part of academic studying and research.
There is no right or wrong way to take notes and this module has only introduced you to a few examples of note-taking methods. You may already have a good method that works for you (e.g. liner notes, bulletpoints, revision cards, etc.*), but there is no harm in exploring some alternatives as well.
The important thing is that your note-taking does not involve re-writing everything you hear or read - you need to learn to work out what's important to note, and what you can leave it out. This may take some practice, but you will get there in the end.
BREAK
Summary Tips:
- Write legibly - there's no point making notes you can never read again! Use a computer, laptop or tablet if you are worried about your handwriting speed or legibility.
BREAK - Make notes visually appealing - leave spaces, use colour (e.g. different coloured inks) or illustrations, symbols, pictures, diagrams, etc. Find a visual format that appeals to you.
BREAK - Use headings, sub-headings, bullet points or numbered lists - even if you have to add these in later.
BREAK - Learn to use abbreviations, rather than writing in full sentences. Come up with shorthand codes for common words and phrases. See this list from Advanced Study Skills by Ostler & Ward as an example.
BREAK - Use block capitals or underlining for key words - again, add them later if necessary.
BREAK - Don't copy out chunks from books - put notes into your own words and make a note of book titles and page references you've used in case you need to return to them later.
BREAK
 Note-Taking Module Review Quiz
Now that you have worked through the Note-Taking Module, you need to complete the Review Quiz.
Your Personal Tutor may want to discuss the answers you give to this quiz in a future one-to-one discussion, and if you have any further questions or concerns about note-taking, you can always visit the Study Centre, room 235 at the top of the ILC.
| Review Quiz - Note-Taking |
BREAK
BREAK
BREAK
*Alternative note-taking technique videos:
Revision & Exam Practice
 Revision. Ugh.
Maybe you managed to get good grades at GCSEs without revising and you're hoping it will be the same for A levels? Sadly, it won't.
Maybe you think it's best to leave all your revision to the last minute, so that it's "fresh in your head"? Sadly, that won't work any more either - there's just too much to cram in for a last minute skim!
So what are you going to do...?
In this module we'll help you find your best revision strategies (everyone is different!) and get you ready for your exams with plenty of time to spare...
Revision & Exam Practice Tip #1 - Work out how you like to revise
 BREAK
BREAK
That's right, how you LIKE to revise.
The only way you can concentrate on your revision is if you're enjoying it. Is that even possible? Well, yes, maybe...
Everyone's brain is different - some people like colours or pictures, some like order, some like it noisy!
There are a lot of different techniques you can use to help you assimilate all the information you'll need to impress the examiners. But just reading through your notes and hoping some of it might sink in is not going to be enough for college - you need knowledge and skill, which only comes from repetition and practice.
BREAK
What makes your brain happy?
There are a number of ways to try and work out how your brain prefers to learn. You could start by thinking about how you usually remember things. Not school or college things - the things you know you always just seem to remember, like movie quotes, song lyrics, dance steps, sports statistics, etc. Why do you find it so easy to fill your brain with that stuff, but not the knowledge that's going to help you get a university place or a job in the future?
Quick Activity
 |
A quick and easy way to try and work out what makes your brain happy is to complete this Memory Style test. You'll need:
|
When you have completed the test, read through the feedback suggestions to see what sorts of techniques your brain might have used to remember the words - you may have used more than one technique, so make a note of them. You'll need them for the essential activity on the next page.
Are you more of a visual, auditory or kinesthetic learner?
 Visual Learners Visual Learners |
 Auditory Learners Auditory Learners |
 Kinaesthetic Learners Kinaesthetic Learners |
|
|
|
|
Possible revision techniques:
|
Possible revision techniques
|
Possible revision techniques
|
Table adapted from Revision and Examination Techniques PowerPoint by www.langley-sec.solihull.sch.uk
Revision & Exam Practice Tip #2 - Picking your revision methods
BREAK
 Quick Activity
Complete this worksheet on revision strategies to help you assess how you like to learn and plan the best methods of revision for each of your subjects. You will find a list of revision methods and strategies below, but this is by no means exhaustive and you may already have some techniques that work for you. You can upload your completed worksheet if you wish.
| Revision Methods Worksheet | Upload your completed worksheet here |
BREAK
The list of revision methods and strategies is very long! Entire books and websites are dedicated to various techniques, so there has to be one out there to suit you.
Here's a small sample:
| Revision Technique | Type of Learner | Details |
| Mindmaps |
Visual & Kinesthetic |
See the Mind Mapping section in the Note-taking module for more information on making and using them.
|
| Mnemonics |
Auditory & Kinesthetic |
My Very Elderley Mother Just Speaks Utter Nonsense = Mercury, Venus, Earth, Mars, Jupiter, Saturn, Uranus, Neptune |
| Journey technique |
Visual |
You might also like the Loci method.
|
| Rhymes or songs |
Auditory |
e.g.
In 1954 the Supreme Court made a clear decision Or: |
| Flow diagrams |
Visual & Kinesthetic |
similar to mind maps, but they can go up, down, or sideways across sheets, and might be good for timelines or processes.
|
| Flash cards (a.k.a. cue cards) |
Kinesthetic |
|
| Sound recordings |
Auditory |
or
|
Adapted from Revision and Examination Techniques PowerPoint by www.langley-sec.solihull.sch.uk
Revision & Exam Practice Tip #3 - Create and prioritise a revision timetable
BREAK
The good thing about creating a revision and exams timetable is that good feeling you get from organising your time efficiently and letting everyone know (or your family/teachers, at least) that you're serious about this revision lark. The bad thing is that it can sometimes become the main thing you focus on, rather than doing the revision itself! How do you get round this?
 Use the two step process of prioritising what you need to do when, and then setting up exactly what you will do in your allotted slot.
BREAK
Step 1: To work out your priorities, you can use this sheet - Revision Guidelines.
This worksheet forces you to first think about how much time you should give to each subject. You might want to prioritise based on when the exams will take place, or which subject you know you struggle more with. It's up to you. The second page of the Revision Guidelines sheet gives you the chance to break your subjects down into topics so that you know exactly what you need to revise and you can keep a record of what you've done as you go. It's broken down into revision chunks, which we'll discuss more on the next page.
BREAK
BREAK
Step 2: Creating a revision timetable is a very personal thing. You could use your college timetable as a basis (e.g. paste it into PowerPoint and adapt it with 'Shapes' or 'Text Boxes'), or you could adapt the sample timetable here, altering the dates and adding your own subjects into the time slots of your choice. Don't forget to grey out the areas you know you can't use because of work, sleep, fun, etc.
Alternatively, you could check if there's an app/apk or other computer programme you fancy using... If you need some help creating your timetable, ask your Personal Tutor or visit the Study Centre, room 235, top floor of the ILC.
BREAK
 Quick Activity
You should complete one of the above worksheets - either the revision guidelines sheet, the sample timetable, or you can create your own personalised timetable format if you prefer. This is an essential activity, so you can upload one of the options if you wish (if you use an app or other programme, you can upload a print screen image as evidence).
BREAK
| Revision Guidelines Worksheet | Upload your revision preparation example here |
| Sample Timetable | (use either the worksheets provided or upload your own, personalised example) |
Revision & Exam Practice Tip #4 - Get your revision materials sorted
BREAK
You know how you like to revise and what methods you want to use for each subject.
You have page 2 your Revision Guidelines sheet filled in for each of your subject units and topics.
You have your revision timetable pasted on your wall, your bedroom door (with the Keep Out sign), your phone and/or the fridge.
You have your textbooks and your class notes at the ready.
You've picked the first subject, unit and topic to focus on today...
Now what...?
BREAK
Remember I mentioned above that we'd explain the page 2 Revision Guidelines chunks? Well, here we go:
BREAK
 - 1st Revision = get creative! Make your lovely mind-maps, diagrams, 1-page notes, flash cards, recordings, etc. This is the first part of your revision, as it's making you go through your notes and books and pull out the most important things you know you need to learn. You could also work with friends and classmates on these or, if you just fancy cheating, you could check online revision sites for ideas and ready-made revision notes you can borrow and adapt for your own needs. Just remember to cross-check them with your own notes to make sure they're correct and appropriate for your specification.
BREAK
- Summary Notes - you can now organise these however you want and spend some time reviewing them. If they're visual or kinaesthetic, pin them about your room, or your whole house if you're allowed. If they're auditory, set up your playlist and start listening. Get someone to test you on the notes you've made.
BREAK
- Self Test - I know what you're thinking - isn't this the test bit? Well, yes and no. Obviously you can test yourself on the knowledge again here. BUT for this bit, you should really test yourself by trying out some actual exam questions using that knowledge you've been filling your head with. Compare your answers to the mark schemes - what did you get right and what could you have done better? It's at this point you should also be checking on your exam technique; if you're not confident about how to answer exam questions, talk to your teachers a.s.a.p. If you're not sure where to get practice papers and mark schemes from, take a look at tips in the Exam Preparation module.
BREAK
- 2nd Revision - now's the time to pull all that knowledge and practice you've done above together and work on the bits you're missing. Maybe you need to go back to the books and improve your knowledge; maybe you need to check that you're answering the questions the way the examiners want...
BREAK
After all that, it's a case of repetition and practice until your exams start. Regular repetition will strengthen your knowledge and skills. That couple of big revision sessions can now become lots of little revision sessions: picking a practice question, checking your knowledge, answering the question, checking your answer.
BREAK
Don't forget to ask for help from your teachers or the Study Centre whenever you need it.
Revision & Exam Practice Tip #5 - How long should you revise for?
BREAK
Revision means looking at something again; it does not mean looking at a new topic for the first time just before an exam. Revision means you’ve already been to lessons, read the books, done the homework and now you’re looking at it again.
BREAK
Lots of students ask how long they should spend on revision. For instance, is an hour a night too much or too little?
Here's the science bit:
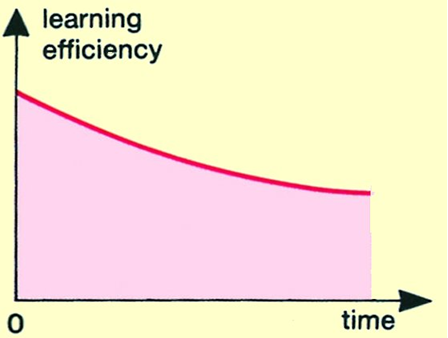
- Don’t spend too long revising. There is a law of diminishing returns. If you just sit down to revise, without a definite finishing time, then your learning efficiency falls lower and lower, like this:
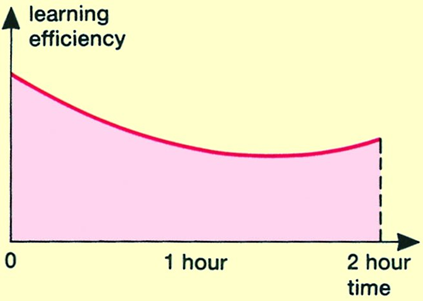
- If you decide at the beginning how long you will work for, with a clock, then, as your brain knows the end is coming, the graph rises towards the end:
How can you improve this even more?
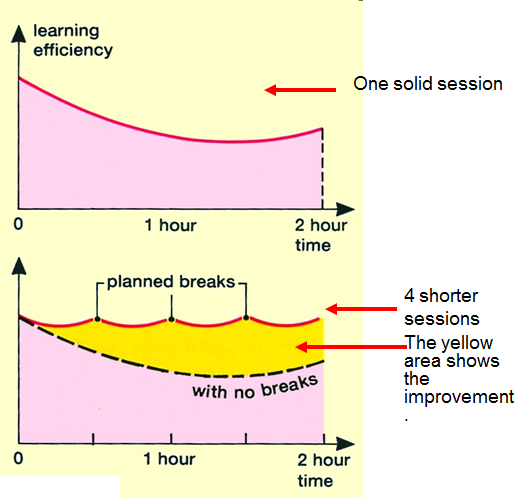
- If you break up a 2-hour session into 4 shorter sessions, each of about 25-minutes, with a short planned break between them, then it is even better.
- Compare the next 2 graphs:
So, how often should you revise?
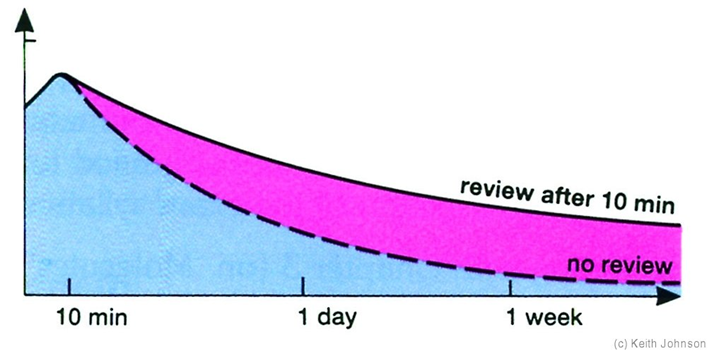
Look at the graph below.
It shows how much your brain can recall later. It rises for about 10 minutes …and then falls.
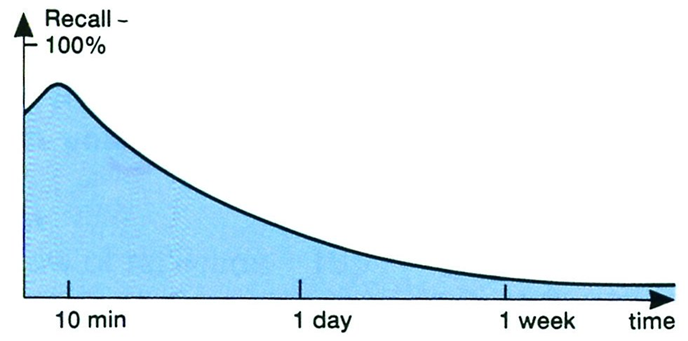
However, if you quickly re-revise after 10 minutes, then it falls more slowly! This is good.
Analyse the new graph:
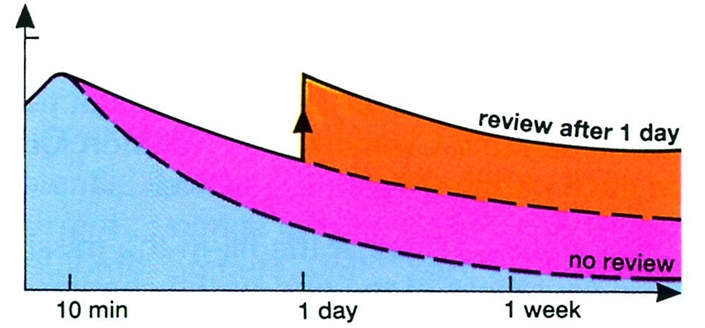
Even better, if you quickly re-revise again, after 1 day, then it falls even more slowly! Good!
Analyse the new graph:
And even better still, if you quickly re-revise again, after 1 week, then it falls even more slowly! Great!
Analyse the new graph:
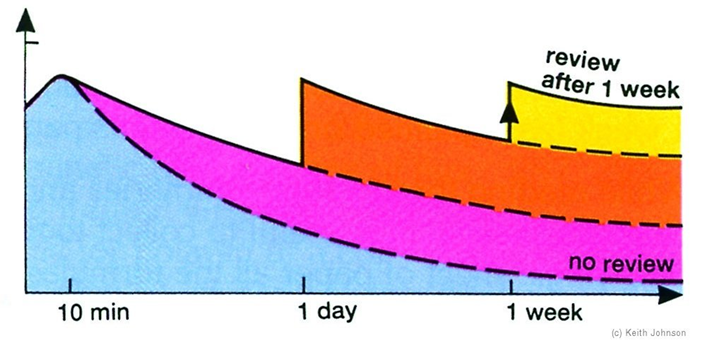
So the best intervals for 'topping-up’, by reviewing or briefly re-revising are:
-
- 10 minutes
- 1 day
- 1 week
- …and then 1 month.
- Revise – Make notes in your preferred learning style
- Repeat – Go through everything again, concentrating on what you still don’t understand
- Review – Every week, spend some time going through everything you’ve done in the past week
BREAK
Information adapted from Revision and Examination Techniques PowerPoint by www.langley-sec.solihull.sch.uk. If it doesn't make any sense, blame Maths and Science!
Revision & Exam Practice Tip #6 - Answering exam questions
The truth about exams is:

- they are not designed to catch you out,
- they provide an opportunity for you to demonstrate your abilities,
- examiners like giving marks to people who do what is asked of them,
- they can be completed in the allotted time, and
- everyone’s memory is sufficient for what they need to learn to get a good grade.
BREAK
Exam questions come in a variety of styles: multiple choice, tick box, short answer, long answer, essay style, etc. Understanding exactly what is being asked of you is the most important first step in getting good grades.
BREAK
Command Words
To make sure you understand what the question is asking you to do, it may be useful to clearly highlight the command word on the exam paper just so you’re clear what they are asking (see the BUG technique below).
A variety of command words may be used:| Account for | Explain why something is the way it is. |
| Analyse | Explain your view of why the main points of an idea, text or process are important. Do not just describe. |
| Calculate | Show the method and obtain a numerical answer. |
| Compare | Write about the differences and similarities. |
| Conclude | Make a decision after thinking something through. |
| Contrast | Show the differences between two things. |
| Criticise | Analyse and make a judgement or give an opinion. Do not just be negative, give a considered view. |
| Define | Give a brief explanation of what something means. |
| Describe | Say what something or someone is like or give an account of events. |
| Discuss | Explain the advantages and disadvantages of something, and give your opinion. |
| Evaluate | Make a judgement about the quality of something, taking the evidence into account. |
| Explain | Give reason WHY something is as it is or HOW it operates. |
| Give reasons for | Explain using words like because to make clear WHY things happen. |
| Identify | Point out the required features or reasons. |
| Interpret | Explain what you understand to be the meaning, or what someone else intended the meaning to be. |
| Justify | Give good reasons for. |
| Summarise | Give the main points of an idea or an argument. |
BREAK
Tips for Answering Questions
BREAK
1. Read the question twice.
2. Use the BUG technique. This is a metacognitive technique designed to help you correctly interpret questions. The BUG technique stands for:
- Box
Put a box around the command word(s). This also serves as a quick reminder when you come back to the question at different times. - Underline
the key words in the question. This will help you sort out not only the content expected, but also any limitations, e.g. only a specific timescale, or only one side of an argument to be analysed. You will also be weighing up which words you think are important and eliminate words that are not so vital. - Glance back and check
have you missed out any words which are important and change what you have to do? This is an often overlooked step by students, anxious to get started with their answers. But this is the part which helps you to develop critical thinking skills, and it is an important self-check to ensure you have done the previous two steps properly.

3. Check the number of marks available. If you have already been practising with past papers, mark schemes and Chief Examiners' reports, you should have some idea of whether it is a mark per point or marks for particular levels of ability/knowledge.
BREAK
4. Use the space provided as a rough guide to how much you should be writing.
BREAK
5. For longer answers, take some time to think and plan your answers. See the section on long answer questions in the Exam Preparation module of this course.
BREAK
6. Attempt every question. If you're stuck on a question, leave it and come back to it later. If all else fails, just make a guess. Try not to leave blanks - you can't lose marks for an incorrect answer, but you might gain some marks from a good guess!
BREAK
7. Do not rush to finish the exam. There are always some people who finish early. But it is better to plan and answer questions properly than rush your work (potentially making silly mistakes) and then sit around waiting for the end. If you do manage to finish early, make good use of the time to read back through your answers.
BREAK
___________________________________________________________________
For additional advice on answering exam questions, take a look at these resource sheets from the National Extension College's Learning Skills Guide:
Revision & Exam Practice - Summary & Review Quiz
 To sum up:
BREAK
1. Make sure you know how to revise in a way that works for you (and your brain!). Choose the right kind of revision strategies and methods to match your learning style. Make it fun!
BREAK
2. Organise, time-manage and prioritise your revision using plans and timetables.
BREAK
3. Make sure you know how to answer the exam questions by practicing, asking for help and advice from subject teachers, and using the exam board resources (such as past papers, specimen papers, mark schemes and chief examiners' reports).
BREAK
4. Attend all your lessons to maximise your chances of success, including the revision sessions prior to the exams. There is a proven correlation between excellent grades and excellent attendance.
BREAK
5. Stay healthy - eat well, drinks lots of water, get plenty of rest and sleep, exercise, take breaks. You need a healthy body to support a clever brain.
BREAK
 Revision & Exam Practice Module Review Quiz
Now that you have worked through the Revision & Exam Practice Module, you need to complete the Review Quiz.
Your Personal Tutor may want to discuss the answers you give to this quiz in a future one-to-one discussion, and if you have any further questions or concerns about preparing for exams, you can always visit the Study Centre, room 235 at the top of the ILC.
| Review Quiz - Revision & Exam Practice |
BREAK
Exam Preparation
Coping with Exams...
BREAK
No matter how hard you might work to prepare, exams are always a nerve-wracking time.
So this module will give you some hints and tips on how to deal with preparing for exams and avoiding unnecessary stress and anxiety...

BREAK
 Quick Activity:
Before we go any further, it's a good idea to check how prepared you already are and what you still need to do. Complete the checklist below and save the worksheet on your college computer drive or print it out for yourself so that you can start working through everything you have to do.
This is an essential activity, so you can upload the worksheet (word document or pdf scan) when completed if you wish. You should continue using the worksheet until you can confidently tick everything off.
| Exam Preparation - Checklist Worksheet | Upload your completed worksheet here |
Exam Preparation Tip #1 - the run up
Don't stop revising!
If you’ve been revising, then you should be approaching your exams with a certain amount of confidence.
Keep going with your revision and remember to refer to practice papers, mark schemes, and Chief Examiners Reports to really help you understand:
BREAK
- what the exam paper is like – how long, number of questions, types of sections (compulsory, optional, multiple choice, etc.), spread of marks, how much time you should spend on each question, etc.
BREAK - how to get the top band marks – which AOs (Assessment Objectives) do the questions expect you to use? Do you need conclusions, definitions, comparative arguments? etc.
BREAK - what the examiners are expecting from you – defining key terms? Using specific layouts? Including particular examples? etc.
BREAK
You can find all three of these documents on the Exam Board websites, where there should be free copies of past or specifimen documentation to view. Click on the logos below to visit the exam board websites. You usually need to search for your subject under the 'Subjects' or 'Qualifications' menus, depending on the Board.
 Deal with any anxiety as soon as possible.
If you're starting to feel anxious about exams:
BREAK
- keep working through this module for tips on preparation,
BREAK - speak to your personal tutor, subject teachers or senior tutor about your concerns,
BREAK - pop up to the Study Centre for some advice on dealing with your anxiety,
BREAK - see if you can make an appointment to speak to or receive some email advice from one of the college counsellors. It's free and confidential.
BREAK
There's always help available - all you have to do is ask!
Exam Preparation Tip #2 - the night before
 Even if you don’t feel like you’ve finished your revision, don’t study into the small hours! Get a good night’s sleep so that you wake up feeling refreshed.
BREAK
Check you have all the equipment you need for tomorrow:
- ID card
- Timetable with rooms
- Pens, pencils, ruler, rubber, calculator, etc.
- Watch
- Water in a label-free bottle
- Single page of important exam revision notes in case of a last-minute need to double check…*
BREAK
 Make sure your transport arrangements are secure, your back up plan is in place, and your alarm clock is working…
Exam Preparation Tip #3 - on the day...
 BREAK
BREAK
Stay calm!
Depending on the exam and how confident you feel about your revision, you might be feeling absolutely fine; don’t let anyone you talk to before the exam put you off! (Avoid talking to people, if necessary.)
BREAK
If you’re feeling nervous:
BREAK
- Practice breathing slowly to force your body and brain to relax – 'Darth Vader’ breath, or ujjayi breathing is good to learn. See the suggested YouTube instructional video below.
Instructional video on ujjayi breathing:
Ujjayi / Victorious Breathing in Yoga
BREAK - Put the exam in perspective – you can always retake, even after you leave college.
BREAK - Failure is NEVER an ending.

BREAK - There are people running £multi-million companies who dropped out of school without any qualifications. These exams will not define who you will be, they will simply help you to decide the future path to who you will become.
BREAK - Have a quick scan over your page of important exam revision notes.
BREAK - Smile. Everyone else will think you’re feeling confident. Smile again. Everyone else, in that moment, is more ignorant than you... ;)

BREAK
Exam Preparation Tip #4 - in the examination room...
BREAK
Settling into the exam
- Make sure you are physically comfortable. If the chair or desk is wobbling, or if you’re in a draft, and it’s likely to distract you, tell the invigilator before the exam starts.
BREAK - Make sure you can see a clock or watch. Take a look at 'Exams - Watching the Clock' for timing tips.
BREAK - Ignore everyone else.
BREAK - As soon as the exam starts, write down anything you know you need to remember (mnemonics, exam technique tips, abbreviations, etc.) so that you can reduce the demands on your working memory during the exam.
BREAK - Read the question instructions carefully. Make sure you know exactly which questions you must answer.
BREAK - Skim-read through all the questions before you start answering any – there is no rule which states you must start with question 1 (unless, of course, the exam specifically instructs it, in which case there is…!).

Interpreting the question correctly is very important.
- Don’t alter a question to suit what you’ve revised.
BREAK - Look carefully at key words such as describe, compare, explain, evaluate, etc., and distinguish between them.
BREAK - Underline or highlight these and any key words or terms in the question.

For optional questions:
- Make a careful selection of the questions you feel able to answer.
BREAK - Avoid those questions that might reveal inadequate knowledge of the subject, or that you don’t really understand.

Plan your time allocation carefully.
- Jot down the time at which you will stop answering the question and move on to the next.
BREAK - Allow time at the end for checking your answers.
BREAK - For your first answer, choose the easiest question or the one that you know enough about. This will boost your confidence and ease you into the exam.
BREAK - Be careful not to spend too long on the first answer, especially if you do know a lot about it.
Exam Preparation Tip #5 - Long questions? Plan your answers!
 Plan your answers carefully.
Yes, you do have enough time to make quick plans in exams! Talk to your subject teachers about their suggestions on the best way to plan longer answers in each of your subjects. Here a few simple and general suggestions:
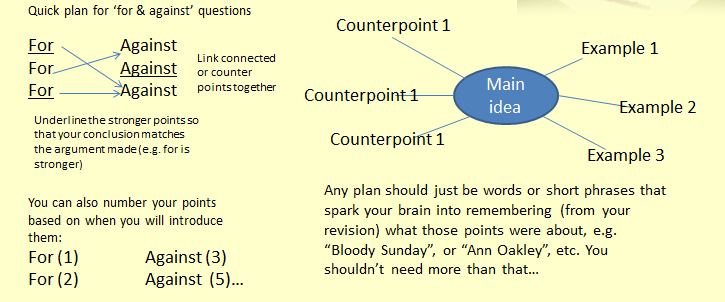
Always re-read the question before you start writing to check you’ve used relevant examples/points.
It is OK to use and re-use the wording and terminology or phrases from the question in your introduction and throughout your answer to help you stick to the point.
For other types of questions, read back through Revision and Exam Practice Tip #6 - Answering exam questions.
Exam Preparation - Summary and Review Quiz
BREAK
What should you do if…?
BREAK
 Your mind goes blank?
If this happens, it’s because your stress level is very high. Take a deep breath and (internally) talk yourself through the panic. Think back to your lessons, your revision, to the chair you were sitting on and the books you used, or the music you played in the background. The chances are it will trigger off some response. If all else fails, just start writing – anything – to break the tension and reboot your memory (reuse the words in the question to start you off if necessary).
BREAK
Y ou realise – halfway through or later – that you’ve misinterpreted the question and written the wrong thing?!
If you have time, start again and finish, if necessary, in note form or bullet points. If you do not have time to start again, finish the answer you are writing rather than giving up halfway through. You may have included enough relevant information to gain some marks.
BREAK
 You can’t answer any of the questions?
Again, stay calm and take a deep breath. Remind yourself again of the worse case scenario (you’ll have to retake...?). Take another look through all the questions – there’s bound to be one you can answer something for, even if it’s only writing part of the answer, so just start writing that and see what happens…
BREAK
BREAK
BREAK
BREAK
 Exam Preparation Module Review Quiz
Now that you have worked through the Exam Preparation Module, you need to complete the Review Quiz.
Your Personal Tutor may want to discuss the answers you give to this quiz in a future one-to-one discussion, and if you have any further questions or concerns about preparing for exams, you can always visit the Study Centre, room 235 at the top of the ILC.
| Review Quiz - Exam Preparation |


